Master wild tiger photography with field-tested camera settings, lens recommendations, top Indian reserves, composition advice, and low-light strategies.
Introduction & Scenario Camera Settings
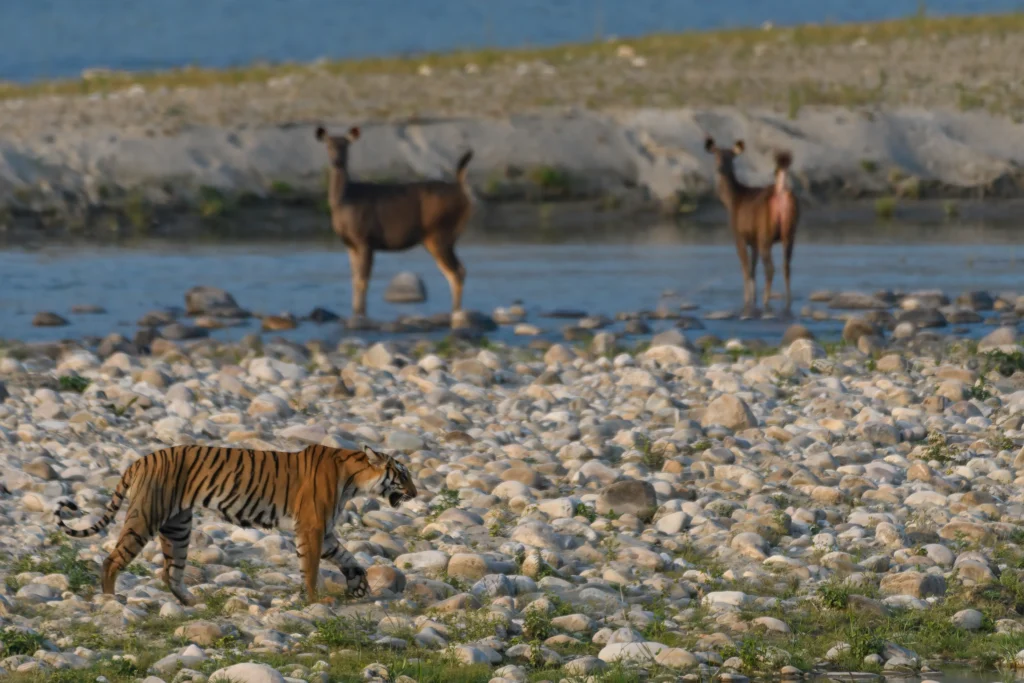
Photographing wild Bengal tigers (Panthera tigris tigris) requires balancing rapid technical decisions with unpredictable wildlife behavior. Sighting a tiger in an Indian forest often happens within high-contrast light, behind dense foliage, or during the dim transitions of dawn and dusk. A successful photograph depends on selecting the right camera settings before the vehicle stops, rather than scrambling with dials during a brief encounter.
Getting sharp, well-exposed images requires knowing your baseline numbers: shutter speeds must freeze subject motion, apertures must balance light intake with depth of field, and ISO values must compensate for dark forest canopies.
Best Camera Settings for Tiger Photography by Scenario
Camera settings for tiger photography are dictated by whether the animal is stationary or in motion, and whether you are shooting through open clearings or heavy shade. Adjust your camera to the baseline conditions of the habitat as you drive, rather than waiting for a predator to appear.
┌─────────────────────────────────┐
│ TIGER ACTIVITY ASSESSMENT │
└────────────────┬────────────────┘
│
┌───────────────────────┴───────────────────────┐
▼ ▼
[Stationary Tiger] [Moving Tiger]
• Shutter: 1/500s • Shutter: 1/1000s+
• Aperture: f/4 – f/5.6 • Aperture: f/4 – f/5.6
• ISO: 1600–3200 (Shade) / 400 (Sun) • ISO: 1600–3200 (Compensate)
• AF: Single-Point AF • AF: Continuous (AF-C / AI Servo)
Settings for Stationary Tigers in Forest Shade
When a tiger is resting, grooming, or sitting alert in shaded undergrowth, subject movement is minimal, but ambient light is severely constrained.
- Shutter Speed: Set a baseline of 1/500 second. This speed eliminates minor camera shake caused by handholding long telephoto lenses or engine vibrations from a running safari vehicle.
- Aperture: Shoot between f/4 and f/5.6. While shooting wide open at f/2.8 maximizes light, stopping down 1 to 2 stops from your lens’s maximum aperture yields noticeably sharper results across the whiskers, eyes, and facial contours.
- ISO: Raise your ISO to 1600–3200. Do not hesitate to use higher sensitivity values in the forest. Modern full-frame and crop sensors manage noise cleanly up to ISO 3200, and a sharp image with fine luminance grain is vastly superior to a blurry image shot at ISO 400.
Field Note: If both your vehicle and the tiger are completely stationary and you are resting your lens on a stable beanbag, you can lower your shutter speed to 1/250–1/500 second to reduce ISO noise, provided the animal remains still.
Settings for Moving Tigers and Action Sequences
A tiger walking along a safari track, patrolling territory, or charging across a clearing demands an immediate shift in exposure values to freeze movement.
- Shutter Speed: Use a minimum of 1/1000 second for a steady walking stride. For charges, leaps, or territorial territorial clashes, push the shutter to 1/1600 or 1/2000 second.
- Aperture: Keep your aperture at f/4 to f/5.6. This range provides a forgiving depth of field that keeps the tiger’s entire head in focus even if your focal plane shifts slightly as the animal strides toward you.
- ISO: Adjust dynamically between 1600 and 3200 in shaded corridors, dropping to 400–800 only when the tiger steps into direct sunlight.
- Drive Mode: Set your drive to High-Speed Continuous Burst. Capturing sequences allows you to select the exact frame where the tiger’s front paw is lifted and its gaze aligns with the camera.
Early Morning Low Light vs. Bright Afternoon Sun
Light levels fluctuate drastically between morning and afternoon game drives in Indian reserves.
- Early Morning (6:00 AM – 9:00 AM): Forest canopies filter early rays, leaving tracks in deep twilight. Use Aperture Priority (A/Av) at the lowest available f-stop (f/4–f/5.6) combined with ISO 1600–3200. This combination allows your camera to maintain the fastest possible shutter speed for ambient conditions. Keep Exposure Compensation at 0 to avoid unnecessary exposure drag.
- Bright Afternoon (1:30 PM – 4:00 PM): Direct midday sunlight creates harsh dynamic contrast between white stripes and dark foliage. Lower your sensitivity to ISO 400, maintain f/5.6 to f/8, and utilize shutter speeds of 1/1000 second or higher to prevent blowing out orange and white fur highlights.
Autofocus Strategy: Single-Point Precision vs. Area Tracking
Tiger sightings frequently occur in tall elephant grass, bamboo thickets, or dry deciduous scrub. Wide autofocus areas will consistently latch onto foreground branches or tall grass blades instead of the predator.
┌────────────────────────────────────────────────────────────────────────┐
│ AUTOFOCUS SELECTION GUIDE │
├──────────────────────────┬─────────────────────────┬───────────────────┤
│ Habitat Condition │ Recommended AF Mode │ Focus Point Type │
├──────────────────────────┼─────────────────────────┼───────────────────┤
│ Grass / Thick Cover │ Single-Point AF │ Small Center Box │
│ Open Road / Clearing │ Continuous (AF-C / Servo)│ Dynamic / Zone AF │
│ Head-On Approaching │ Continuous + Animal Eye│ Tracking Box │
└──────────────────────────┴─────────────────────────┴───────────────────┘
- In Grass or Thick Cover: Switch to Single-Point AF using a small, precise focus box. Place this single point directly over the tiger’s eye or muzzle to prevent the autofocus mechanism from grabbing foreground clutter. Avoid Auto Area AF and Wide Area AF modes in dense vegetation.
- In Open Corridors: Switch to Continuous Autofocus (AF-C on Nikon/Sony, AI Servo on Canon) with preferred expanded tracking points. If your camera features Animal Eye AF, engage it to track the predator’s head as it moves through clear terrain.
Table 1: Tiger Photography Camera Settings by Scenario
| Scenario | Shutter Speed | Aperture | ISO Range | Focus Mode & Point | Drive Mode |
| Still Tiger in Dense Shade | 1/500s | f/4 – f/5.6 | 1600 – 3200 | Single-Point AF (Nearest Eye) | Single / Low Burst |
| Walking / Stalking Tiger | 1/1000s+ | f/4 – f/5.6 | 1600 – 3200 | Continuous AF-C / AI Servo | High-Speed Burst |
| Fast Action / Charging | 1/1600s – 1/2000s | f/4 – f/5.6 | Auto ISO (up to 6400) | Continuous AF-C / Animal Eye | Maximum Burst Rate |
| Early Morning Low Light | 1/500s (or camera priority) | f/2.8 – f/4 (Widest) | 1600 – 3200 | Single-Point AF | High-Speed Burst |
| Bright Afternoon Track | 1/1000s+ | f/5.6 – f/8 | 400 – 800 | Continuous AF-C | High-Speed Burst |
| Vehicle in Slow Motion | 1/200s minimum (with IS) | f/4 – f/5.6 | 1600 – 3200 | Continuous AF-C | High-Speed Burst |
Expert Tip: When photographing while the safari vehicle is idling or creeping forward, never drop below 1/200 second, even with optical image stabilization (IS) active. A good rule of thumb is to set your minimum shutter speed to roughly twice your focal length (e.g., 1/1000s for a 500mm lens) to neutralize platform vibration.
Gear Essentials & Safari Timings
Tiger Photography Gear: Lenses, Bodies, and Support Systems
Capturing a tiger requires specialized optics and a setup designed for the unpredictable realities of the Indian jungle. While a camera body with excellent low-light autofocus is important, your lens choice and field support system ultimately determine whether you return with a crisp wildlife portrait or a blurry snapshot.
Telephoto Focal Lengths: 400mm, 500mm, 600mm, and Versatile Zooms
Your lens selection is the most critical gear decision for a tiger safari. Given mandatory safety distances and the elusive nature of the predator, a minimum of a 400mm telephoto lens is required.
- Professional Primes: For uncompromising sharpness and maximum light gathering, 500mm f/4 or 600mm f/4 prime lenses are the ideal professional choice. These lenses allow you to effectively blur distracting foreground brush and excel in the dim conditions of a shaded forest track.
- Versatile Zooms: A 150–600mm zoom lens is highly versatile, covering multiple field scenarios. A tiger might appear 100 meters away across a meadow and then suddenly emerge from the grass right next to your vehicle. A heavy zoom allows you to track its movement and re-frame the shot instantly without losing the subject.
Multi-Body Setups and Secondary Lenses
Changing lenses in the middle of a fast-paced sighting costs precious seconds and exposes your sensor to severe dust. If your gear allows, always carry a multi-camera setup.
- Keep your heavy prime lens (400mm, 500mm, or 600mm) attached to your primary camera body.
- Mount a secondary zoom lens, such as a 70–200mm or 100–400mm, on your second camera body. This combination provides the flexibility to capture both tight headshots and wider environmental portraits revealing the tiger’s habitat.
Vehicle Support Systems and Dust Protection
Shooting from an open 4×4 safari vehicle introduces unique stabilization challenges. Heavy telephoto lenses (400mm and above) require reliable physical support to minimize shake.
- Vehicle Support: Tripods are often unwieldy and impractical inside a shared safari vehicle. Instead, rest your camera securely on the vehicle window or use a heavy beanbag draped over the frame for stability.
- Dust Management: Safari trails in India are exceptionally dry, and constant vehicle vibration creates thick clouds of dust. Carry a protective cover for your cameras to prevent dust and moisture from infiltrating your gear. A microfiber cleaning cloth is essential—wipe your lens carefully before shooting, as dust on the glass will cause frustrating blur.
Practical Checklist: The Safari Camera Bag
- Primary camera body with 400mm+ lens
- Secondary camera body with 70–200mm or 100–400mm lens
- High-capacity power bank (crucial for long drives)
- Camera dust cover and microfiber cleaning cloths
- Safari beanbag for window support
Table 2: Lens Selection Guide for Tiger Safaris
| Lens Type | Focal Length | Best Field Application | Estimated Price Range |
| Minimum Telephoto | 400mm+ | Essential baseline for wildlife visibility | $1,500 – $3,000 |
| Professional Prime | 500mm f/4 | Razor-sharp images, exceptional low light | $6,000 – $10,000 |
| Professional Prime | 600mm f/4 | Maximum reach, professional sharpness | $10,000 – $14,000 |
| Versatile Zoom | 150–600mm | Flexible framing for multiple scenarios | $1,000 – $2,000 |
| Secondary Zoom | 70–200mm | Habitat context, flexibility, wide shots | $800 – $2,500 |
| Secondary Zoom | 100–400mm | Flexibility with moderate telephoto reach | $1,300 – $2,500 |
Best Time to Photograph Tigers: Lighting Conditions and Daily Patterns
Tigers are primarily crepuscular, meaning their peak activity aligns perfectly with the golden hours of photography. However, the unique terrain of Indian tiger reserves—featuring deep ravines, tall grasslands, and dense Sal forests—creates lighting challenges that photographers must anticipate.
Morning Safari Window (6:00 AM – 9:00 AM)
The morning drive offers the best opportunity to photograph active wildlife. Tigers are often on the move during this period, patrolling their territory or returning from a night hunt.
- Between 6:00 AM and 9:00 AM, the low-angle sun casts a warm light that beautifully illuminates the tiger’s orange coat.
- The primary challenge during this early window is the lack of light. Because tigers frequently travel through shaded forest corridors, you must rely on wide aperture settings (f/4–f/5.6) and a high ISO (1600–3200) to maintain a fast shutter speed.
Afternoon Safari Window (4:00 PM – 6:00 PM)
As the harsh midday heat begins to break, tigers rouse from their slumber and begin moving again.
- Between 4:00 PM and 6:00 PM, the evening golden hour provides another brief window of warm, directional sunset light.
- During this time, tigers frequently head down to lakes and waterholes to drink or cool down, offering excellent behavioral photography opportunities.
Managing Deep Canopy Shade and Contrast
While golden hours produce beautiful light in open meadows, much of your tiger photography will occur under heavy foliage. A tiger moving through deep shade requires a very different technical approach than one walking across an open field.
When light is limited in shaded forests, prioritize your exposure triangle to capture maximum light. Use the lowest f-stop your lens allows (f/4–f/5.6) and push your ISO to 1600–3200. Modern cameras can handle high ISO levels well, and as the light fades, you must increase your ISO. A sharp photograph with visible grain is always a success; a clean photograph rendered blurry by a slow shutter speed is unusable.
Table 4: Optimal Safari Photography Timings & Light Dynamics
| Time Window | Lighting Characteristics | Expected Tiger Activity |
| Early Morning (6:00–9:00 AM) | Low light in shade; warm, low-angle light in open | Most active; patrolling, moving after night |
| Late Afternoon (4:00–6:00 PM) | Warm evening light; approaching sunset | Highly active; heading to water to drink |
Locations & Field Composition
Top 10 Tiger Photography Locations in India
Choosing the right reserve dictates the type of images you will capture. Some parks offer dense populations and high sighting probabilities, while others provide unique environmental backdrops or quieter, less crowded experiences. Your choice should align with your specific photographic goals rather than just overall popularity.
Central India: Bandhavgarh, Kanha, and Tadoba-Andhari
Central India forms the core of the country’s tiger tourism, characterized by dry deciduous forests, rocky hills, and expansive meadows.
- Bandhavgarh National Park (Madhya Pradesh): If your primary goal is maximizing encounters, Bandhavgarh holds the highest tiger density in India. The park delivers frequent sightings and provides opportunities to photograph tigers alongside elephants and leopards.
- Kanha National Park (Madhya Pradesh): As one of India’s largest reserves, Kanha offers a high concentration of tigers set against vast meadows and towering Sal forests. The diverse settings make it ideal for capturing tigers within expansive landscape shots.
- Tadoba-Andhari Tiger Reserve (Maharashtra): Known as the “Jewel of Vidarbha,” Tadoba is a rising star in wildlife photography. It has emerged as a prime location due to its unique landscape and growing tiger population.
Northern and Western Habitats: Ranthambore, Jim Corbett, and Dudhwa
These parks offer distinctive historical and geographical backdrops, from ancient architecture to Himalayan foothills.
- Ranthambore National Park (Rajasthan): Ranthambore is a well-established tiger stronghold known for its habituated tigers, allowing for excellent close-up opportunities. Photographers highly value the park for its dry forests, lakes, and the unique ability to frame tigers against ancient ruin backdrops.
- Jim Corbett National Park (Uttarakhand): Established in 1936, this is India’s oldest national park. It offers a historic setting with diverse wildlife, allowing photographers to capture tigers, elephants, and leopards in the same region.
- Dudhwa National Park (Uttarakhand): For those looking to avoid peak season congestion, Dudhwa offers a quieter, less crowded experience. The park provides unique opportunities to photograph tigers alongside swamp deer.
Southern and Eastern Habitats: Nagarhole, Periyar, Anamalai, and Sundarbans
Moving south and east introduces tropical foliage, mangrove swamps, and water-based photography.
- Nagarhole National Park (Karnataka): Situated in the Nilgiri Biosphere Reserve, Nagarhole is considered the best location for tiger photography in southern India. The park supports a rich ecosystem where photographers can encounter tigers, elephants, and dholes (Indian wild dogs).
- Periyar Wildlife Sanctuary (Kerala): Periyar offers a lush tropical environment. It stands out for its unique water-based sightings, allowing photographers to capture wildlife from a different vantage point.
- Anamalai Tiger Reserve (Kerala): This reserve features diverse landscapes, transitioning from tropical forests to grasslands and high-altitude areas. Photographers can target tigers alongside regional specialties like the Nilgiri tahr.
- Sundarbans National Park (West Bengal): The Sundarbans is a completely unique mangrove ecosystem. It is the only place in the world where photographers can capture swimming tigers traversing the tidal waterways.
Table 3: India’s Top 10 Tiger Photography Reserves
| Park | State | Tiger Density | Unique Feature | Best For |
| Ranthambore | Rajasthan | High (stronghold) | Ancient ruins backdrop | Close-up, habituated tigers |
| Bandhavgarh | Madhya Pradesh | Highest in India | High encounter rates | Frequent, reliable sightings |
| Kanha | Madhya Pradesh | High concentration | Vast meadows & Sal forest | Diverse habitat settings |
| Tadoba-Andhari | Maharashtra | Rising star | Jewel of Vidarbha | Emerging prime location |
| Jim Corbett | Uttarakhand | Moderate | Oldest park (1936) | Historic, diverse wildlife |
| Nagarhole | Karnataka | High | Nilgiri Biosphere | Southern India’s best |
| Periyar | Kerala | Moderate | Lush tropical environment | Unique water-based sightings |
| Sundarbans | West Bengal | Moderate | Mangrove ecosystem | Swimming tigers |
| Dudhwa | Uttarakhand | Moderate | Less crowded | Quieter experience, swamp deer |
| Anamalai | Kerala | Moderate | High altitude & grasslands | Diverse landscapes, Nilgiri tahr |
Field Composition Techniques for Impactful Tiger Images
Technical perfection means little if the composition is static or unengaging. Exceptional wildlife photography requires intentional framing that communicates the animal’s behavior and environment to the viewer.
Achieving an Eye-Level Perspective from Safari Vehicles
The physical angle of your lens dictates how the viewer connects with the subject. Shooting down at a tiger from the top of a high safari vehicle creates a distant, detached perspective.
To create a more immersive and powerful frame, you must shoot at the tiger’s eye level. Reach out of the vehicle window and get your camera as low as safely possible. An eye-level perspective establishes an intimate connection, making the viewer feel as though they are present in the jungle rather than acting as a distant observer.
Pinpoint Focus on the Nearest Eye
A wildlife photograph lives or dies by the subject’s eyes. The eyes are the most expressive part of the animal and are critical for creating a connection with the viewer.
If the tiger’s eye is not sharp, nothing else in the image matters, and the entire photograph will feel fundamentally flawed. Always lock your focus point onto the tiger’s nearest eye. If you are shooting manually on a screen, tap directly on the eye; if using a modern camera body, engage the animal eye detection autofocus, which is highly accurate for felines.
Leaving Space for Movement and Applying Balanced Framing
When a tiger is on the move, resist the urge to place the animal dead-center in your frame. Static framing kills the momentum of an action shot.
- Space for Movement: Always leave negative space in front of the tiger for it to walk into. This off-center placement enhances the sense of movement, energy, and direction within the photograph. It gives the image a narrative and a dynamic feel, which is an essential rule for moving subjects.
- Rule of Thirds: Utilize your camera’s grid settings (the 9-block display) to position the tiger at the intersections rather than the center. Keeping the subject in a corner of the frame while capturing some of the natural surroundings results in a balanced, artistic image that feels grounded in its environment.
Expert Tip: If a tiger is walking directly toward your vehicle (a head-on shot), you can break the rule of thirds and utilize a center composition to emphasize the predator’s symmetry and power.
Challenging Conditions, Smartphones & Post-Processing
Tackling Challenging Conditions: Heavy Vegetation and Sighting Crowds
Photographing wild tigers rarely happens in sterile conditions with clean sightlines. You will frequently encounter heavy cover or multiple safari vehicles maneuvering along the same trail. Overcoming these hurdles requires precise autofocus control and the right field temperament.
Cutting Focus Through Tall Grass and Dense Bushes
Tigers often bed down in dense bamboo clumps, tall elephant grass, or thick lantana bushes. In these scenarios, camera autofocus systems frequently fail by grabbing the nearest foreground branches or grass stems instead of the animal.
- Autofocus Selection: Disengage multi-point, Wide Area AF, and Auto Area AF immediately. Switch to Single-Point Autofocus using the smallest available focus box. This gives you precise manual placement to thread your focal point directly through tiny gaps in foliage and lock onto the tiger’s eye or facial features.
- Aperture Strategy: Shoot with a wide aperture between f/2.8 and f/4. A shallow depth of field helps throw foreground grass and distracting background twigs out of focus, letting the predator stand out from heavy vegetation.
- Low Light Compensation: Dense undergrowth blocks ambient sunlight. Push your sensitivity to ISO 1600–3200 to ensure you maintain a minimum shutter speed of 1/500 second to freeze any subtle twitches, head turns, or sudden movements.
- Balanced Exposure: Check your histogram carefully to maintain a balanced exposure so that dark shadows inside thickets do not crush the detail in the tiger’s black stripes.
┌────────────────────────────────────────────────────────────────────────┐
│ VEGETATION FOCUSING: STEP-BY-STEP PROTOCOL │
├────────────────────────────────────────────────────────────────────────┤
│ 1. Switch autofocus from Wide/Zone AF to Single-Point AF. │
│ 2. Select the smallest available autofocus box. │
│ 3. Manually place the single focus point through gaps directly on eye. │
│ 4. Set aperture to f/2.8–f/4 to soften foreground grass blades. │
│ 5. Keep ISO at 1600–3200 to protect 1/500s minimum shutter speed. │
└────────────────────────────────────────────────────────────────────────┘
Managing Vehicle Congestion with Patience and Intentional Shooting
Popular tiger reserves in India, such as Bandhavgarh, Ranthambore, and Kanha, experience vehicle congestion during peak season when a predator is tracked near main safari tracks.
- Mental Preparation: Multiple vehicles sharing a prime sighting are a normal part of tiger tourism in high-density reserves. Mentally prepare for crowded sightings beforehand and maintain an open mind to avoid frustration.
- Patience for Angles: Do not rush your shots in a burst of panic. Wait calmly for vehicles to shift position or for the tiger to step into an unobstructed window along the road.
- Quality Over Quantity: First-time sightings trigger high adrenaline, tempting photographers to fire off thousands of rapid shots. Focus strictly on quality rather than sheer volume. Slow down, shoot with intention, and evaluate your composition to avoid producing hundreds of identical, poorly framed images.
Smartphone Tiger Photography: Capabilities, Limits, and Techniques
While high-end camera bodies with long telephoto primes deliver the highest resolution, modern smartphones can capture usable safari photos if operated within their practical optical limits.
┌──────────────────────────────────────────┐
│ SMARTPHONE SAFARI FIELD DISCIPLINE │
└────────────────────┬─────────────────────┘
│
┌─────────────────────────────┼─────────────────────────────┐
▼ ▼ ▼
[300mm+ Optical Zoom] [Disable All Flash] [Manual/Pro Mode]
• Avoid digital crop • Range is ineffective • Lock low ISO (50-200)
• Use beanbag/tripod • Disturbs animal behavior • Fast shutter (1/500s+)
Minimum Optical Zoom Requirements and Stabilization
Photographing wild tigers with a standard wide-angle smartphone lens results in the subject appearing as a tiny, indistinguishable speck in the distance.
- Zoom Requirements: Use a device with a dedicated telephoto module offering at least a 300mm equivalent zoom. Avoid excessive digital magnification beyond optical limits, as digital cropping degrades resolution and produces noisy, pixelated images.
- Physical Stability: At long focal lengths, handshake is magnified significantly. Stabilize your phone using a compact travel tripod, a clamp, or by bracing it firmly against a beanbag rested on the vehicle’s window frame.
- Lens Cleanliness and Battery: Safari trails generate continuous dust that settles onto phone lenses, causing haze and soft focus. Keep a microfiber cloth accessible and wipe your camera lenses before every sighting. Carry a portable power bank on long morning and afternoon drives to prevent sudden battery drain.
Manual Camera Controls and Ethics
- Manual/Pro Mode: Switch out of standard automatic mode into Pro/Manual shooting. Manually configure your shutter speed to at least 1/500 second to avoid motion blur and keep your ISO as low as lighting allows to reduce sensor noise.
- Never Use Flash: Ensure your phone flash is strictly turned OFF. Built-in LED flashes have an effective throw of only a few meters, making them entirely useless for distant wildlife photography. Firing a flash can disturb natural animal behavior and violates sanctuary etiquette. Rely entirely on natural ambient lighting, wide lenses, and sensor sensitivity.
Table 5: Smartphone vs. Dedicated Camera Systems in the Field
| Feature | Smartphone Setup | Dedicated Camera (DSLR / Mirrorless) |
| Effective Zoom | 300mm equivalent baseline minimum | 400mm to 600mm telephoto reach |
| Field Stabilization | Tripod or window clamp essential | Beanbag, monopod, or lens stabilization |
| Exposure Control | Manual/Pro mode required | Full Manual / Aperture Priority mode |
| Flash Operation | Must be disabled completely | Must be disabled completely |
| Low-Light Capability | Limited sensor size; high noise in shade | High performance at ISO 1600–3200 |
| Image Sharpness | High risk of softness at high zoom | Razor-sharp focus with proper settings |
Post-Processing Workflow for Tiger Photography
Raw files captured in dense forest shade or high-contrast sunlight require careful post-processing to balance dynamic range and bring out natural textures without creating artificial-looking results.
RAW vs. JPEG and Core Exposure Balancing
- File Format Selection: Always capture images in RAW format if you plan to edit your files. RAW files preserve complete sensor data, giving you the latitude needed to recover deep shadow details and tone down blown highlights. If you do not intend to edit your photographs, set your camera to JPEG Fine.
- Exposure Adjustments: Begin your post-processing by balancing core exposure values. Lift shadow values moderately to reveal facial markings concealed by forest canopies, while pulling down highlights to protect the white fur on the tiger’s throat and cheeks.
- Color Correction: Calibrate color temperature and tint to reflect the warm tones of the early morning or evening golden hour without oversaturating the tiger’s coat. Adjust contrast and micro-contrast carefully to preserve natural fur texture.
Editing Software: Lightroom Mobile vs. Snapseed
Different editing tools serve distinct stages of field workflow and final output needs.
- Adobe Lightroom Mobile: The premier choice for professional wildlife photographers. It features full RAW file decoding, selective adjustment masks, lens calibration profiles, and precision color wheels for accurate skin and fur correction.
- Snapseed: A capable, free application designed for casual mobile edits. It provides quick access to curve adjustments, exposure balancing, and selective brightening without requiring subscription plans or complex file management.
Table 6: Post-Processing Applications Comparison
| Application | Cost / License | Best Target Use | Core Editing Capabilities |
| Adobe Lightroom Mobile | Free / Paid Subscription | Professional RAW workflow | Full RAW support, color grading, shadow recovery |
| Snapseed | Free | Quick mobile adjustments | Fast filters, selective exposure, tonal curves |
| Photoshop Express | Free / Paid Subscription | Advanced mobile corrections | Layer-based tools, blending, advanced cleanup |
| Google Photos | Free | Instant basic tweaks | Automated enhancements, cropping, quick sharing |
Common Mistakes, FAQs & Editorial Summary
10 Common Tiger Photography Mistakes to Avoid
Even experienced wildlife photographers encounter avoidable pitfalls when shooting tigers in Indian reserves. Recognizing these common errors before your safari will help you protect your gear and maximize your keep rate.
- Mistake 1: Insufficient Shutter Speed for Moving Tigers
Using a shutter speed of 1/500 second while a tiger is walking or running introduces subtle motion blur along the legs and muzzle. Increase your shutter speed to at least 1/1000 second for a walking stride, and higher for fast action.
- Mistake 2: Relying on Auto Area or Wide Area Autofocus
Allowing the camera to choose the focus point in dense scrub causes the autofocus system to lock onto foreground grass or branches rather than the tiger. Always switch to Single-Point AF in heavy vegetation for precise manual placement.
- Mistake 3: Shooting Downward from the Top of the Vehicle
Standing tall and aiming down at a predator produces an awkward, distant perspective that diminishes the subject’s presence. Lower your camera to the vehicle’s window frame to shoot directly at the tiger’s eye level for an intimate, powerful frame.
- Mistake 4: Centering Moving Subjects Without Lead Room
Framing a moving tiger in the dead center of the frame results in static, unengaging compositions. Always leave negative space in front of the animal for it to walk into, creating a sense of forward momentum and narrative.
- Mistake 5: Leaving the Camera Flash Enabled
Using flash on safari is ineffective due to short throw distances and disrupts natural wildlife behavior. Ensure all internal and external flashes are disabled completely, relying entirely on sensor sensitivity and fast lenses.
- Mistake 6: Prioritizing Burst Quantity Over Intentional Composition
Firing off thousands of frantic continuous frames during an adrenaline-fueled sighting creates excessive identical, poorly composed photos. Slow down, evaluate the background and light, and shoot with clear compositional intention.
- Mistake 7: Neglecting Safari Dust Protection
Safari tracks in India generate constant fine dust that settles on optical elements, resulting in soft, hazy images. Always use a camera cover while driving and clean your front lens element with a microfiber cloth before every sighting.
- Mistake 8: Underexposing by Fearing High ISO Values
Keeping your ISO locked at 100 to 400 under heavy forest canopies forces slow shutter speeds that blur the subject. Embrace ISO 1600 to 3200 in shaded environments; modern sensors handle high ISO grain cleanly, and a sharp image with noise is far better than a clean, blurry one.
- Mistake 9: Shooting Exclusively at Maximum Wide-Open Aperture
Shooting wide open at f/2.8 can result in soft edges and a depth of field so shallow that only a single whisker remains sharp. Stop down 1 to 2 stops to f/4–f/5.6 to achieve peak optical sharpness across the entire facial plane.
- Mistake 10: Choosing the Wrong Reserve for Specific Goals
Booking a reserve without assessing its tiger density and terrain can lead to mismatched expectations. If frequent sightings are your top priority, target high-density parks like Bandhavgarh or Kanha rather than lower-density terrain.
Frequently Asked Questions About Tiger Photography
1. What are the best camera settings for tiger photography?
For stationary tigers in forest shade, set your shutter speed to 1/500 second, aperture between f/4 and f/5.6, and ISO between 1600 and 3200. For walking or moving tigers, maintain an aperture of f/4 to f/5.6, raise your shutter speed to 1/1000 second or faster, and adjust ISO between 1600 and 3200 in shade (dropping to ISO 400 in bright afternoon sun). Use Single-Point AF in grass and Continuous AF in open clearings.
2. What lens do I need for a tiger safari?
A telephoto lens with a minimum focal length of 400mm is required for adequate reach. Professional primes like the 500mm f/4 or 600mm f/4 deliver optimal sharpness and low-light performance, while a 150–600mm zoom lens provides versatile framing across changing sighting distances. A secondary 70–200mm or 100–400mm lens is ideal for habitat shots.
3. What is the best time of day to photograph tigers?
The best times are the early morning window between 6:00 AM and 9:00 AM and the late afternoon window between 4:00 PM and 6:00 PM. During these golden hours, tigers are most active, and the low-angle sun provides warm light.
4. Where are the best tiger photography locations in India?
- Bandhavgarh National Park: Highest tiger density in India, delivering frequent encounters.
- Ranthambore National Park: Established stronghold with habituated tigers and historic ruins backdrops.
- Kanha National Park: Large reserve featuring vast meadows, Sal forests, and high tiger numbers.
- Tadoba-Andhari Tiger Reserve: Emerging prime destination with rich tiger habitats.
- Nagarhole National Park: Premier southern reserve in the Nilgiri Biosphere.
5. How do I photograph tigers behind bushes or in grass?
Switch to Single-Point AF with a small focus box to manually place your focal point through gaps in the vegetation. Use a wide aperture between f/2.8 and f/4 to soften distracting foreground foliage, set ISO to 1600–3200, and keep your shutter speed at a minimum of 1/500 second.
6. Should I shoot at eye level with tigers?
Yes. Shooting at the tiger’s eye level creates an intimate, powerful frame that draws the viewer into the scene. Avoid aiming down at the animal from high vehicle perches; instead, lower your camera near the window frame or vehicle side.
7. How do I get sharp tiger photos in low early morning light?
Use Aperture Priority set to the widest available f-stop (f/4 to f/5.6 on telephoto lenses) combined with an ISO of 1600 to 3200. This configuration lets in maximum light, enabling your camera to select the fastest safe shutter speed. Use continuous tracking (AI Servo / AF-C) and rest your lens securely on a vehicle beanbag.
8. What ISO should I use for tiger photography in forests?
Under dense forest canopies and during early morning drives, use ISO 1600 to 3200. In bright, direct afternoon sunlight, reduce your sensitivity to ISO 400. Modern camera sensors manage noise well at ISO 3200, making high sensitivity preferable to motion blur.
9. Should I use single-point focus or wide-area focus?
Use Single-Point AF whenever the tiger is partially obscured by tall grass, bushes, or tree branches. In open tracks or clear meadows, switch to Continuous AF (AF-C / AI Servo) with dynamic zone points or Animal Eye tracking. Avoid Auto Area AF, which tends to latch onto foreground vegetation.
10. How should I photograph tigers when multiple vehicles are at a sighting?
Mentally prepare for vehicle congestion in popular parks, especially during peak travel months. Remain patient, avoid rushing your shots, and wait calmly for clear shooting angles to open up. Prioritize intentional, well-composed frames over rapid burst firing.
11. What shutter speed is required for still vs. moving tigers?
- Stationary tigers: Minimum 1/500 second to neutralize handheld camera shake.
- Walking / Moving tigers: Minimum 1/1000 second to freeze stride motion.
- Fast Action / Charges: 1/1600 to 1/2000 second.
- Slowly moving safari vehicle: Minimum 1/200 second (or twice your focal length).
12. What aperture gives the sharpest results?
While wide apertures (f/2.8–f/4) maximize light gathering, stopping down 1 to 2 stops from your lens’s maximum aperture (f/4 to f/5.6) produces peak sharpness across facial details and whiskers while providing adequate depth of field.
13. Do I need a tripod inside a safari vehicle?
Traditional tripods are impractical inside shared safari vehicles. Instead, use a filled safari beanbag rested over the window or vehicle metal bar to support heavy 400mm+ telephoto lenses. For smartphone photography, a compact clamp or mini-tripod is essential for stability.
14. Can I use flash for tiger photography?
No. Flash is ineffective for distant wildlife photography and disrupts natural predator behavior. Always keep camera and phone flashes switched off.
15. How do I apply the rule of thirds to tiger photos?
Position the tiger at the grid intersections (roughly one-third into the frame) rather than dead center. Capture surrounding environmental elements to ground the animal in its natural habitat.
16. Should I focus on the tiger’s eye or the full body?
Always place your focus point directly on the nearest eye of the tiger. A wildlife portrait depends heavily on sharp eyes; if the eye is soft, the entire photograph fails regardless of body sharpness.
17. Should I leave space in front of a walking tiger?
Yes. Always leave negative space in the direction the tiger is heading. This compositional technique gives the image narrative energy and prevents the movement from feeling abruptly cut off by the frame edge.
18. Do I need a dedicated dust cover for my camera?
Yes. Safari trails in India produce fine, airborne dust that settles on optical elements and penetrates camera joints. Keep a protective cover over your gear and wipe down your lenses with a clean microfiber cloth before shooting.
19. Should I shoot high volumes of photos or focus on quality?
Focus strictly on quality over quantity. While the initial excitement of a sighting makes burst shooting tempting, taking a deliberate approach and composing with intention results in a stronger final collection.
20. Is post-processing necessary for tiger photographs?
Yes. Shooting in RAW format allows you to recover shadow details lost under dark canopies, pull back clipped highlight patches on white fur, and calibrate color balance. Adobe Lightroom Mobile is recommended for professional RAW processing, while Snapseed offers quick, free mobile adjustments.
Editorial Field Summary
Photographing wild Bengal tigers successfully requires technical discipline, field adaptability, and patience. Because wildlife sightings are brief and dynamic, dialing in your baseline camera settings—shutter speeds above 1/500 second, apertures between f/4 and f/5.6, and ISO ranges between 1600 and 3200—ensures you are prepared the moment a predator appears.
Pairing a telephoto lens (400mm or longer) with a stable beanbag support system allows you to capture sharp details while maintaining safe distances. Prioritizing an eye-level vantage point, locking pinpoint focus on the nearest eye, and giving moving tigers room to walk within your composition will elevate your portfolio from standard wildlife snapshots into memorable field portraits. Approaching every sighting with intentional focus and respect for sanctuary regulations guarantees an ethical and rewarding safari experience.